Is There an Easy Mitered Corner for Quilts
Mitered Border Corners
Posted on June 20 2018
For a lot of beginning quilters, making mitered corners is a bit well, terrifying. It looks complicated. Today we are going to take the fear away and you will actually be ready to do this technique on any of your quilts or quilt blocks.
To show you the difference between mitered corners and traditional corners, we have made two samples. You will notice the one on the left is the traditional way to add your borders. Your border is as long as the quilt is long and then ends and the top border is then sewn across.
If you are using stripes, this can be a bit abrupt. By mitering your corners, you can make the fabric appear almost seamless as it travels around the corner. This is pictured on the right.

The first step is to square up your quilt top. Take a square ruler and place in each of the corners. If anything needs to be trimmed, do it now.

For this tutorial, we will be working with an 18 ½ x 20 ½ inch square. Our border strips will be 3 inches wide. In order to determine the length of our strip, we will need to use this formula:

We have already cut our border length at 30 ½ inches. We now need to cut our border width at 3 inches. To keep the continuous flow, you will want to start and stop your cutting at the same spot for each strip. You might need to trim some excess fabric to keep your stripe in the same place. For this step, we are using a red and pink stripe fabric from Tula Pink's All Stars Collection. We will start each one of the strips on a pink stripe. We have cut away the extra red stripe.

Now, go ahead and cut your first strip- for this tutorial, we cut the strips at 3 inches wide and are using the Creative Grids 3 x 12 inch Turn Around Ruler.

Once the first strip is cut, put a marker (we used a Clover Binding Clip) on the side of your first cut. This will help you remember what side is to be sewn to your quilt top. This is also important because it will keep your stripes flowing around your quilt and they should match up on the diagonal when you are all done. Notice that the marker is on the pink stripe.

Now cut the second border strip for the 20 ½ inch side. Remember to cut on the same stripe and put your marker on the same stripe.

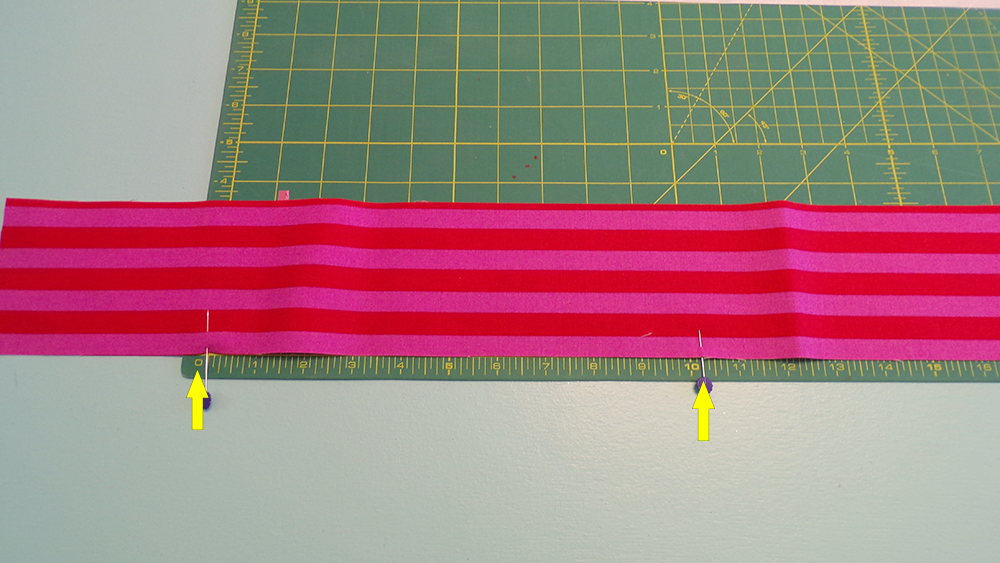
Our next step is to mark the center of each of the 20 ½ inch sides of your quilt top. Fold the edges together and put a pin in the fold. Do this on both sides of your quilt top.

Then, mark the center of each of your 20 ½ inch border strips on the side you will be sewing to your quilt top. Fold edges together and put a pin in the fold on the edge that is to be sewn to your quilt top.

Now, mark the border strip to measure 20 ½ inches. Start from the center pin and go out 10 ¼ inches on both sides. Then do it on the second strip as well.
Now, we are going to attach our borders to our quilt top. First, match up centers and pin.

Then, match up each edge that is marked and line up on the end and pin. You can now fill in with extra pins if you would like. Then go ahead and do the opposite side.

Before we can sew, we need to measure in 1/4 inch from each edge. With a Frixion pen and a ruler, measure in and make a mark. You should have 4 marks at this point, one on each corner of your quilt top.


You will sew from each of your 4 marked lines - line to line- using a 2.0 stitch length and a 1/4 inch seam. Put your needle down exactly at the first mark, take a couple of stitches forward and backward, doing a tack stitch.

Sew directly to your mark and make sure to do a tack stitch at the end as well. If you go beyond your mark, you will want to unpick those stitches.

Sew the other side the same way. Press seams towards your border.

Now, let's move to the shorter sides of your quilt. Let's review our formula, but note that the numbers change because it's the shorter side:

We have gone ahead and cut our borders for our 18 ½ inch sides of our quilt. They measured 3 inches wide by 28 ½ long. Find the center by folding in half and placing a pin in the fold.

Again, you will mark the center of your quilt top. Gently fold the already sewn border out of the way and match each corner to find the center.

Then mark the centers of your border strips and measure out from the center pin 9 ¼ inches and put a pin in there.

Line up the centers and begin to pin. When you get to the corners, move the other border gently out of the way. Simply fold it back so you can see your corner, Line up the edge and pin.

Now, flip your quilt top over so you can see your previous stitching. Put your needle down exactly where your stitching ended on the other borders. If you do this, you will not have any puckers or open spots. Be sure to do a tack down stitch at the beginning and the end.

Complete your seam by ending at the other corner where the former stitching started. If you stitch too far over, you will need to unpick these stitches.

Now, you can see you have your four borders attached. You also have four tails. It is supposed to look like that. Press all seams toward the borders and make sure you don't have any holes or puckers.

Fold your quilt on the diagonal. Don't be worried about the quilt, BUT pay very close attention to your borders.

Line up your border strips along the top and bottom, right sides together.

Put in a lot of pins to keep the edges of the border together.

On the back side, you have a seam that is pressed towards the border. You need to flip that seam up and put a pin in it to hold it up. By doing this you will not get a pucker when you start stitching.

With everything lined up, take a ruler that has a 45 degree angle marking on it. You will push the border seam up and line your 45 degree marking on the stitching line.


Using a Frixion pen, draw a line right where your previous stitch ended to the edge of the border fabric. You now have your perfect miter.

Put your needle down exactly where your previous stitching left off. Sew on the drawn line. NOTE: If you start stitching at the edge of the border, you will end up with puckers. Be sure to do a tack stitch at the beginning and at the end of your stitching.

You have sewn your first border. Open it up and make sure it doesn't have any puckers. If you have any problems, fix it before you cut the excess fabric away.

Make sure that everything is out of the way and lying flat. With a ruler, cut the excess fabric away leaving a 1/4 inch seam allowance.
Now we are going to press.
We will press from the back and press the miter seam open. Gently open the seam with your fingers, then using the tip of a hot iron press flat along the seam.


Then you want to take the flap where the quilt top and borders meet and press it toward the borders.

Turn quilt back over and give a really good pressing from the front.
Congratulations! You have made your first mitered corner borders.

Supplies used in this tutorial:
Olfa Splash Rotary Cutter
Olfa Rotary Blades
Flower head pins
Havel Seam Ripper (good to always have on hand)
Clover Wonder Clips
Frixion Pen
Creative Grids 3 x 12 inch Turn Around Ruler
All Stars by Tula Pink
Source: https://quiltedworks.com/blogs/tutorials/mitered-border-corners
0 Response to "Is There an Easy Mitered Corner for Quilts"
Post a Comment